Thursday, 1 September 2011

Brush, Pencil and Color Replacement Tools tutorials in the photoshop for beginner

dear student of the photoshop here is three nice tool for beginner.

1. Brush Tool : - It is a very power full tool for create own idea. help of this tool you make a digital painting in your computer. and also made a mat painting using the different color.click on this tool you will chose a brush tool and press b on the keyboard you have got it. after taking this tool you right click on photoshop canvas you found many type of brush which will use in your painting.

2. Pencil Tool :- This tool is used like a pencil which you use in your life for write a letter. behavior of this tool is like a real pencil. when you will use this tool with the left mouse button you will find the a thin line in your canvas. short of this tool is also b.

3. Color Replacement Tool : - With the Color Replacement Tool we can change the color in another color. pick color replacement tool and draw on a colorful image you can see here color has been changed. shortcut of this tool is b also.

we are giving below a image for the example.


Saturday, 14 May 2011

using here spot healing brush tool, healing brush tool, patch tool, red eye tool in adobe photoshop tutorial

 Spot Healing Brush Tool:- This tool is a very powerful tool in the adobe photoshop for the removing unwanted point in the image or photograph with the help of left mouse button click, like as black spot, pimples etc you can see in the blew image.
 Healing Brush Tool:- help of this tool we can draw the duplicate image on other image or wallpaper, when you are starting the work on healing brush tool. pick this tool on the toolbar and press alt key from the keyboard and one left mouse button click on the source point after that draw on target point in same or different layer as you wish. you will find the same duplicate target point. view result in the below image.
Patch tool :-This tool is like as healing brush tool. pick this tool and with the help of left mouse button drag around a particular area on the screen like as selection marquee tool. after drag and drop that area where you want.result show in below.


  Red Eye Tool:- Red Eye Tool is worked on only red color, help of the tool, remove the red color in the eyes of image. first of  all select the red area and pick red eye tool and simply click on selected area, remove the red color of eye or other body. below image.

Thursday, 7 April 2011

Photoshop Tutorials - crop and slice tools

Crop Tool and Slice Tool : crop tool is used for the cropping image in the Adobe Photoshop cs3, cs4 and cs5 or other photoshop version. this is from top to fifth tool, after this tool come first Slice Tool, you can use this tool for slicing the image in web page, some time you will see after downloading image you can get a part of image from website because of slice tool done the work with this image. and second tool is Slice select tool is used for the select slicing of image in Adobe Photoshop.

Thursday, 31 March 2011

Photoshop-Tutorials - Toolbar - Move and Selection tool

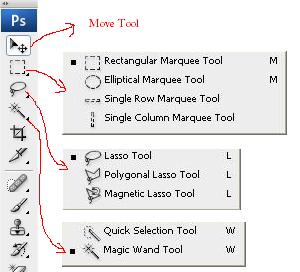
 Toolbar (Move, Marquee, Lasso, and quick selection and magic wind Tool)


Move Tool (V shortcut key) : from the top you can see an arrow this is Move Tool. by help it you can shift the position of  any layer where you want.and drag and drop the layer in new file window for editing.

Marquee Tools(M shortcut key) : After the Move Tool come four Marquee Tools. (First) Rectangular Marquee Tool, help of this you can do selection of  user define layer area in rectangle shape. (Second)  Elliptical Marquee Tool do the help for selection Layer like as Rectangular Marquee Tool in Elliptical Shape. After that is Single Raw and Single Column is doing the work for selection in raw and column shape.


Lasso Tools ( L shortcut key): Third one  is three Lasso Tools in the Photoshop Toolbar. All of these tools is free hand selection tools. First Lasso tool we will use by help press left mouse button and move the layer area as you like. Second Polygonal Lasso tool we can select from left mouse button click on layer area step by step and last of all you click on first point of the path will be convert in selection. in the break path condition you have to double on the layer window path will be connect automatically and create selection on layer window.
Third is Magnetic Lasso tool, this tool do the work like as Polygonal tool but with the self magnetic power. after one click on layer window if you move the cursor on screen you will find automatically adjust the points of path after calculate the color pixels. 


Qick Selection and Magic Wind Tools(W shortcut key): Quick selection tool is working like as a brush, after press left click and move circle pointer on the screen, selection will be automatically in layer window of same color pixel. Magic wind tool do the work for Magic selection same as Quick selection tool. from one left mouse button click on screen of photoshop layer.

In all selection tools, you can use Alt + Left Mouse button for subtract from selection and for add to selection use Shift + Left Mouse buttion.  

Monday, 28 March 2011

Photoshop-Tutorials - File menu- Open

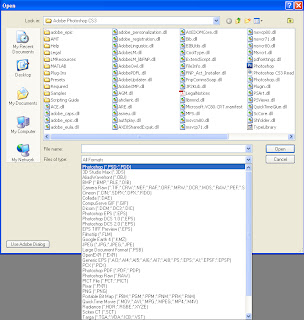
In this Photoshop Tutorials you can learn that  how can open the different format file with photoshop format file in photoshop.
go to file menu and click on open sub menu, a option window appear on your screen. you find the many different file format after click on files type combo list. here is a lot of format witch file you want to open in the Photoshop like as .psd, .jpg., .gif, .png, etc


Wednesday, 23 March 2011

Photoshop Tutorials - File Menu-New


File Menu (New)
For start a new project file you click on (New) submenu of File Menu and findout a option window with default name Untitled. Here is shortcut command ctrl + n for it.

Above you can see a option window first of in the Name text box you will write any user define name for your Photoshop project next is Preset drop combo list. in this list you select you project file size as you want like as photo, us paper, web, mobile, and custom size of photoshop file. if you change the custom setting of image you can use Width, Height, Resolution, Color mode, Background Contents. These attributes have pixels, Inch and more unit and Color mode is RGB COLOR, BITMAP, GRAYSCALE, CMYK COLOR, LAB COLOR with 8,16,32 bit.and in Background Contents you set the background of Photoshop file with White, Background Color and Transprant.  

Sunday, 20 March 2011

Photoshop Tutorials-Photoshop Interface-Photoshop Tips and Tricks

Photoshop Tips and Tricks about Photoshop Interface


Photoshop is a image editor software tool. this product is doveloped by adobe corporation pvt. ltd..Photoshop support file is .jpg, .png, .gif, .tga, .tiff, .eps, .bmp etc. On Photoshop  you can do the work on 3d software file like as .3ds, .obj.  also and   you can do cropping, compositing, ghosting, using layers, creating masks, applying filters, and formatting text with bevels and other effects. photoshop file has .psd exetation.